How to Deploy Django Web Application
Django comes with a development server that helps run Django projects in localhost. However, to make your web application available worldwide you will need a host machine. Amazon Web Services (AWS) provides EC2 (Elastic Compute Cloud) which is the most popular choice to host Django web applications. This tutorial offers a step-by-step guide to deploy django app on aws. The method described here will work on other cloud platforms as well.
Step 1: Creating an AWS account and an EC2 instance Step 2: Move your django project to the cloud instance Step 3: Launch app on local development server port 8000 or you custom domain and port 80
Step 1: AWS account and EC2 instance Setup
Visit AWS Console to create you account and log in. Now, follow simple steps to create an EC2 instance with Ubuntu 22.04 or other preferred OS.
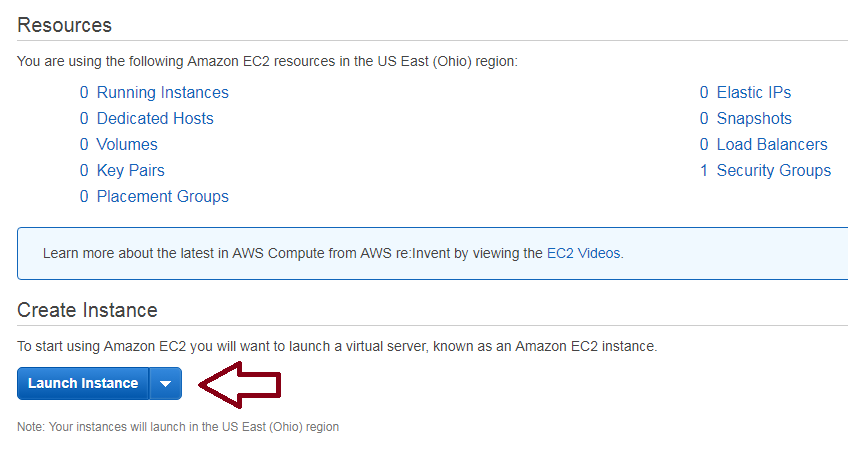
Step 1.1: Select EC2 from AWS Console and launch an instance
This tutorial uses Ubuntu 22.04 LTS. However, you may choose other instances or higher versions as well.
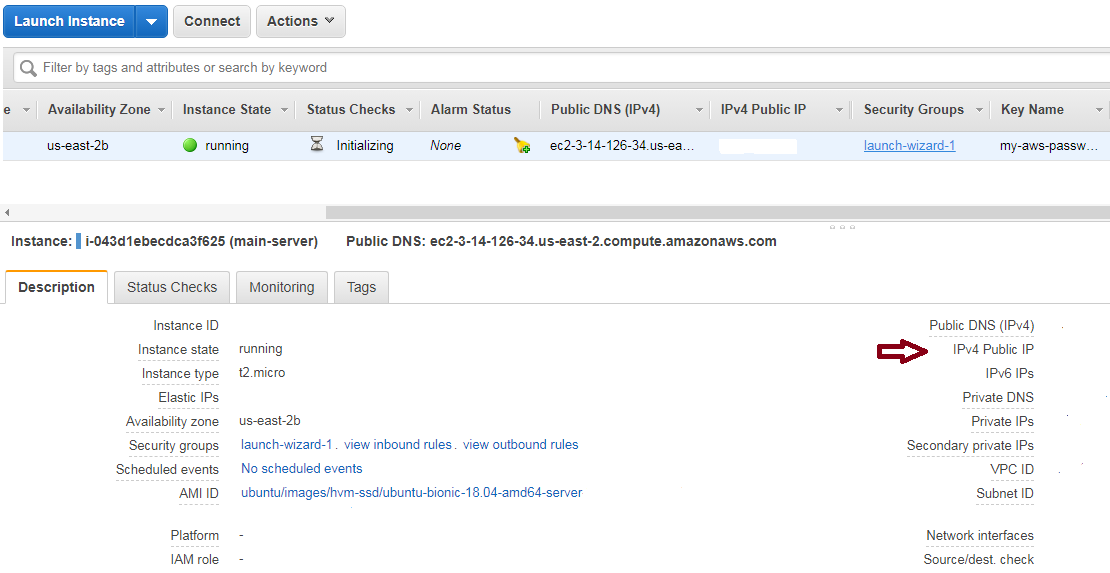
Step 1.2: Setup and initialize your instance
As required create a new key pair or select an existing key pair for your instance. This will be useful for login to your instance later on. Now, wait for initialization to complete and make a note of your public ipv4 address. You will need it for login and you should also mention the same under ALLOWED_HOSTS list of your django project settings.py file.
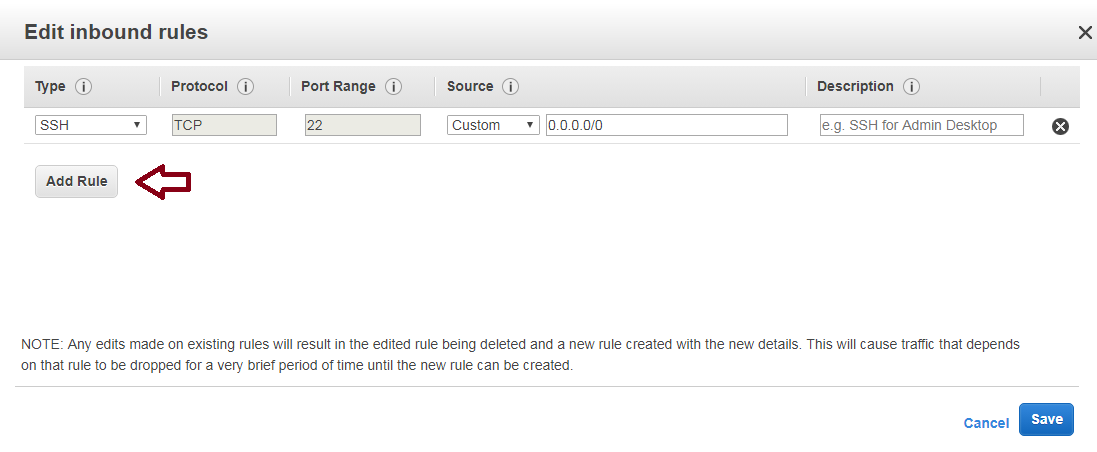
Step 1.3: Setup the security group so that http and https requests to your instance is allowed.
You may add rules like HTTP, HTTPS etc. or simply set it to allow All Traffic
Step 2: Deploy Django Project on AWS EC2 instance
Now that you are done from the AWS side. The next step, is to simply have django and other requirements installed on your ec2 instance. After which you need to move your project code to the Unbuntu EC2 instance that we have setup in the previous step. You may migrate your code from Git repository or simply use scp to secure copy all the project file to your aws ec2 instance.
Step 2.1: Installations on aws ec2 instance
Run the series of below commands after logging in to your Ubuntu instance via putty, ssh or other similar tools.
sudo apt update
sudo apt upgrade
sudo apt install python3-pip
pip install --upgrade pip
With pip you may install django and other packages needed for your project like django-crispy-forms, djangorestframework, etc.
Use of a virtualenv is also recommended
pip install virtualenv
virtualenv myenv
source myenv/bin/activate
If you have a requirements.txt file with all the project dependencies you may install it all via:
pip install -r requirements.txt
Step 2.2: Copy your django project code to aws ec2 instance
Run this command from your local command-line or terminal window:
scp -i *.pem django_project_code.zip ubuntu@public_ip:~/
Here, ubuntu is the user name. It may sometimes be ec2-user or root. If you have a password instead of the pem file you will be prompted to enter the same. -r option can used to recursively add all project file if you want to avpid the zip file. If you have used zip the used the below command to unzip:
sudo apt install unzip
unzip django_project_code.zip
Step 3: Run the app on port 8000 or port 80
Running the app on port 8000 via django development server is easy but for a professional web application we would always recommend a web server like apache or nginx.
Step 3.1: Run the django project on port 8000
Visiting the manage.py file on your server and simply run the command:
python3 manage.py runserver 0.0.0.0:8000Your project is live now and you can access it on your web browser with http://your_ec2_instance_public_ipv4_address:8000. But, to keep it running even when you have closed the server command-line shell, you need to move it in the background on a separate screen.
sudo apt install screen
screen [enter]
python3 manage.py runserver 0.0.0.0:8000
Use Ctrl+a+d to detach the screen. Now, your app will keep running in instance background even if you close all the terminals and exit.
Step 3.2: Run the django project on port 80
Port 80 is the default port for http requests. To run the project on just the ipv4_address or a domain name we need to use a web-application server like apache2. No, further changes is required to your project code but you will need to install apache2 and mod_wsgi.
sudo apt install apache2
sudo apt install libapache2-mod-wsgi-py3
sudo ufw allow 'Apache Full'
sudo systemctl restart apache2
In this approach the user of runserver command or the screen command is not required but you will have to edit the 000-default.conf file to describe python-path, python-home, static file root location, ServerName etc. Also, own the database directory and its parent directory with:
sudo chown db.sqlite3
sudo chown :www-data /path_to_database_parent_directory
At last, run:
sudo service apache2 restartand visit the public_ip or domain name. Congratulations! Your django project is now live on aws ec2 instance.